Resources and links for both novice bushwalkers and hard core backcountry explorers!
Bushwalking is the Australian term for hiking, tramping, trekking, hill walking, or rambling. It is an adventurous and sociable activity that provides the opportunity to build fitness and endurance, acquire navigation, survival and first aid skills, to be self sufficient in the Australian bush as well as developing leadership skills and long lasting friendships.
See members who provide bushwalking activities in Discover (search on ‘bushwalking’ in Activity)
Useful hiking hacks for more enjoyable time on the trail
We love life hacks, all of those ingenious little tips and tricks that make life a little easier and a bit more fun. When you’re hiking in Australia it’s good to make the most of every piece of gear and find crafty solutions to problems that may arise. There are plenty of life hacks you can apply to hiking, bushwalking and trail running.
It may come as a shock to the hardiest of solo-hikers out there, but we are not alone. It’s estimated that there are over 100,000 trillion bacterial cells that make up our human microbiome.
We don’t tend to notice these (mostly good) neighbours in our comfy, urban lives; we cover them up or try to do away with them completely with regular washing with soap and the use of perfumed products like deodorant.
Heading out for a bushwalk means stepping away from everyday hygiene routines. If we don’t do a bit of careful planning on how to look after our lady* gardens, we could be adding unnecessary discomfort, pain or even illness to our adventures. And whilst most people are aware of preventing things like blisters or an ill-fitting pack from ruining their hiking day, the itching, pain or fever from a UTI (urinary tract infection), thrush or other hiker hygiene-related issues can often come as a surprise.
Click button for more info about What’s different in the bush? 😉 and How to avoid UTI’s when hiking
Chances are if you’re reading this, I bet you have been walking for a long time! For about 1 million years now we humans have been getting around thanks to bipedal power. Walking is not only a natural and safe thing to do, but thankfully a very enjoyable activity as well.
Now, bushwalking is not base jumping, we’re unlikely to suffer really serious injuries. However, that doesn’t mean there aren’t risks involved.
… there are some really simple things you can do to ensure that your next hiking adventure is not only safe, but enjoyable.
Summer is often the best time to go hiking. Clear, sunny skies and long daylight hours make for lovely long days of adventuring. But when the temperatures reach 30+ degrees, hiking in the heat can be brutal, so you need to take extra precautions. That’s why we’ve put together these top 10 tips for hiking in hot weather – to help you stay safe and enjoy the trails.
1. Check the weather forecast
Check the weather forecast before you hit the trail, including the morning of your hike. Pay attention while you hike and be flexible with your plans. Downloading a weather app is a great way to stay on top of changing conditions, including wind speed, storm alerts and more.
2. Avoid hiking in the hottest part of the day
Start early, just after sunrise, take a break during the hottest part of the day (usually 11am to 2pm, but this varies), and resume walking when it’s cooler.
3. Know the signs of heat-related illness
During hot weather, it’s easy to become dehydrated or for your body to overheat. This can lead to heat-related illnesses such as heat cramps, heat exhaustion and heat stroke, which can be life threatening. Heat can also make pre-existing conditions worse. Stay cool, stay dehydrated and stay informed – learn the signs and symptoms of heat-related illnesses and how to treat them. When you are hiking, monitor the condition of your hiker friends and have them do the same for you.
4. Be fire ready
Bushfires are common in Australia but it’s likely you’ll complete your summer hike without encountering any fires. Have a good contingency plan that includes what you’ll do if you get early warning signs like the smell of smoke or the distant sound of emergency vehicles. Pay close attention to your navigation so that you know your location at all times. Carry a PLB emergency beacon – they are quite affordable these days – you can hire one if you don’t want to buy one. And familiarise yourself with the many sources of weather and bushfire information.
5. Look out for snakes
You’re more likely to see snakes in summer. You can add to your snake awareness and safety by understanding snake behaviour, which species you’re most likely to encounter and where they prefer to hang out. Snake bites generally occur due to human carelessness or lack of awareness. Take the necessary precautions and the chances of being bitten are remote. Carry a snakebite first aid kit and know how to use it.
6. Cover up
To help stay cool, wear clothing that is lightweight, breathable, and SunSmart. Wear a wide-brimmed hat to protect your neck and ears and cut the amount of UV radiation reaching your eyes. Choose hiking specific shirts – the ones with sleeves that you can roll up, and ventilation flaps. Invest in good-quality hiking socks. Unlike regular socks, hiking socks are designed specifically to protect the foot and wick away moisture. Choose a close-fitting, wrap-around style of sunglasses. Polarised sunglasses will reduce glare and make it easier to see on a sunny day.
7. Apply and reapply sunscreen
Protect as much skin as possible by covering up when you are out in the sun, and apply sunscreen on every exposed part of your body, including the back of your hands. Sunburn is not just painful, it can also dehydrate you and make for a horrible experience. It’s not much fun if you burn your shoulders then need to strap on your daypack. Use a broad-spectrum sunscreen with an SPF of 30 or higher and reapply it regularly (at least every 2 hours), especially if you sweat a lot.
8. Hydrate
Bring more water than you think you’ll need . Drink a litre of water before you start your hike. Then sip water during the day. Small quantities of fluid at regular intervals will keep you well hydrated. Avoid drinking alcohol the day before a long walk – even small amounts of alcohol can cause dehydration.
9. Replenish your electrolytes
Electrolytes are essential minerals, including sodium, calcium and potassium, that regulate nerve and muscle function and help regulate the balance of fluid in your body. When you hike in hot weather and sweat a lot you’ll need to rebalance them. You can do this through food but to replenish them more quickly, try adding electrolyte powder or tablets to your water.
10. Take regular breaks and eat well
Find a shady spot to enjoy a drink and a snack (something that offers slow releasing energy and is low in sugar). Take your bag off and let your body cool down. Don’t exhaust yourself early on. Pace yourself so that you can comfortably walk the rest of your route.
Night Hiking: 19 Steps to Planning the Perfect Trip
Come the end of the fall when the days are at their shortest, it can be a struggle to get your hiking fix in as frequently as you’d like. It’s that time of year when we’re in serious danger of succumbing to the lure of the sofa and giving up on anything adventurous in the outdoors – at least on week nights. But with a little planning and some sensible preparation, getting out hiking after dark could be just the adventure you need to not let the winter blues drag you down.
If hiking is new to you, then it’s important to apply all the usual safety precautions that you would on a daylight hike. Being prepared is key and these winter hiking tips can be easily applied to night hiking. Make sure you do a few hikes in daylight before you tackle anything with the loss of one of your senses.
As well as being a bit of a different way to get outside, night hiking is also the ideal opportunity to spy on some nighttime nature and also to experience your local trail without the noise and distractions of other people. So don’t put those hiking boots away for the winter just yet, but instead get out exploring the nocturnal world. These tips for hiking at night will fill you with the confidence you need to safely step out into the unknown.
The Tips
Clothing and gear for hiking at night
Here are few essentials (on top of your usual hiking setup) that you will need to take and wear on a night hike:
Headlamp and spare batteries
Having a flashlight is essential for night hiking. But having a headlamp is even better. It can live on your head for the duration of the hike, even when it’s not on, and frees up your hands for more important things, like keeping balance. Make sure you bring spare batteries and remember to turn the light off or away when you are talking to people – no-one likes being dazzled by a blinding beam!
Check the weather before you go – avoid getting tired and washed out in hot and humid conditions
Check for any bushfire alerts
Choose a route that’s shaded – ideally with waterfalls or streams along the way
Go early to beat the heat. Go for shorter hikes or plan lunch beside a swimming hole to break up the day
Adjust your walk to your fitness level – the heat can effect you more if you’re still building your fitness.
Hydrate frequently – fill your water bladder and bottles with very cold water and ice. Alternate drinking plain water with electrolytes.
Avoid over hydration – your body is only able to efficiently absorb about ½ L of water per hour. Drinking large amounts of water at once can drop your salt levels in your blood too low
Pack food – Take a selection of thirst-quenching foods (both salty and sweet) such as juicy fruits and frozen fruits (grapes, oranges). Choose small bites of light food over heavy, rich foods.
Wear long, light clothing. Wear hiking clothes that are cool, loose-fitting, lightweight and light-coloured.
Sun protection must-haves – a wide brimmed hat, sunscreen and UV-blocking sunglasses. Carry the sunscreen and lip balm with sun protection with you to reapply throughout the day.
Keep extra cool with a web bandana around the back of your neck and to help keep the sun off your neck.
Underwear check – Choose comfy underwear made from fabrics other than cotton – it absorbs moisture when you sweat, and can rub and chafe. Pack a second pair of socks if you get wet or too sweaty. Women, check your sports bras don’t rub with your backpack over the top.
Don’t be afraid to have regular breaks during your trek – give yourself time to recover and cool down.
Nothing beats getting fresh air out in nature. Check out these tips on training for hiking, so you can hit the trails without being held back.
Go on a hike, and chances are that you’ll pass — or be passed by — grandmothers, children, serious-looking backpackers, and chatty groups of friends. Some hikers plan their trips for weeks, explore the most remote corners of the earth, sleep under the stars, and hunt food with their bare hands. While other hikers prefer to travel no more than a few minutes from home and enjoy an afternoon outdoors before heading home for a shower and then a gourmet meal. Most of us are somewhere in between. All of us are hikers.
Whether you’re planning to plan to hike a mountain or spend a day hiking a long trail, it’s best to consider training for hiking. Here are some tips on how to get in shape for hiking as well as a few exercises you can add to your weekly training plan. Read More
For many years I’ve not bothered using a backpacking checklist. I felt that each trip was always so different to the next that no single backpacking packing list would always have me covered. This is mostly affected by the climate or weather conditions, but also by the duration and difficulty of the expedition. And to a degree, this is true. No two trips are ever the same and there’s most certainly things you’ll need on one trip that are just pointless taking on another.
That said, I can’t tell you the number of times I’ve either forgotten to pack something (usually relatively minor). Or worse, had ongoing anxiety that I’ve failed to pack something major once it’s too late to repack. This is where having a backpacking checklist comes in very handy. Even if you know exactly what you need, it takes away that niggling doubt at the back of your mind and reassures you that you’ve nailed it!
Another great reason to turn to a backpacking checklist before you head to the hills is if you’re just starting out hiking. There may be a few things on the below hiking trip packing list that you may not have thought of, or even known about! Having a packing list will help guide you in the right direction and highlights the extra gear and clothing that you’ll need to buy, hire or borrow to have the most comfortable and safe trip possible.
Heading out on your first hike can be intimidating, but we want to make the outdoors accesible for everyone. Here’s how to start hiking if you’re beginning your outdoor journey from scratch.
Keen to take your hiking adventures to the next level? Off-track hiking opens up a whole new world of unmarked terrain. But there are a few things you should know before you bash your way into the bush.
Plan your hike like your life depends on it – because it does.
Planning is the key to your survival in the Aussie bush…
I’ve been bushwalking most of my life and I prepare for every hike as if it’s my first. If I don’t, it might well be my last.
There is no high better than drinking in our jaw-dropping island nation. Its rugged beauty, its remoteness and its danger are breath-taking. Perfect for an Insta or FB. But it’s also bloody dangerous.
I’ve seen the desperation of family and friends waiting for news of a loved one missing on a bushwalk. I’ve marvelled at the skills of professional and volunteer emergency crews responding to life and death situations.
I know I love hiking, bushwalking, trekking… whatever you want to call it and so do an ever-increasing number of Aussies. But I also know this. If I put my life in danger by being ill-prepared, I also put scores of others at risk.
You don’t hand your car keys to someone who’s never driven. You can’t SCUBA-dive without certification. Why then are so many of us heading into the great unknown without basic information and easily accessible equipment?
Every day our emergency services risk their lives for at least one bush rescue. Frustratingly, they’re often called back to the same location on the same day to save ill-prepared hikers, heading out into the bush without preparation, phone in hand and without a care in the world.
Here’s a few recent emergencies and tragedies;
Victoria – four deaths in four months
Mount Augustus, WA – three deaths in three days
Bluff Knoll, WA – multiple rescues, even after calls for hikers to take safety more seriously
Bungonia National Park, NSW – 17 bushwalkers rescued
Bald Head, WA – multiple rescues and deaths
Lerderderg Gorge, VIC – crews searching for two missing parties came across a third
Leven Canyon, TAS – a group rescued after being ill-equipped for the hike
Queenstown, TAS – a hiker rescued after losing their phone containing maps
Last year State Emergency Service (SES) Queensland volunteers completed more than 11,600 hours on Land Search, Special and Vertical Rescue operations. That’s more than 483 days! The North Coast Region Fire and Rescue Service (FRS) performed 33 remote area rescues.
Every state and territory has similar and shocking rescue figures, and to borrow a phrase from the PM, “How good are our professional and volunteer emergency services?”
But as much as I admire them, their heroics are not always necessary. What is necessary, is for anyone on a hike to take personal responsibility.
I’ve organised hikes for one of the nation’s largest hiking groups for seven years and frankly feel a combination of anger and amazement when some people turn up ill-prepared. This has included;
No navigation aids – map, compass, or GPS
Relying on smartphones for navigation. (Coverage is not guaranteed: batteries go flat, phones can be lost or damaged)
No tent fly on an alpine winter hike. These keep you alive!
Heading out with broken backpacks on multi-day hikes
No stove for meals on overnight hikes
I’ve sworn under my breath, bitten my tongue and thought, “I know this might be because you’re new to hiking… but really? Really?”
Planning is the key to your survival in the Aussie bush… and snapping that awe-inspiring pic.
I urge anyone with a passion to explore, to stop and take a moment to consider the challenge. Prepare for the worst, ‘walk safe’ and ‘leave no trace’. Never take your safety for granted.
Keep to the tracks. Environmental damage aside, you put your life at risk. My question to thrill-seeking snappers is simple, “Is your life worth one like on social media?”
The gear you need varies from a two hour stroll to a two week trek, but the principles are the same; plan, plan, plan.
You don’t need to put aside 10 hours for every walk, but you must consider the length, difficulty and remoteness of your hike. As a rule of thumb, I reckon 20 percent is about right. You need at least 24 minutes to plan a two hour walk or three hours minimum for an overnighter.
Here are the basics;
Avoid hiking alone. A minimum group of three is safest
Consider the fitness, medical issues, experience, and skill of your group
It sounds cruel but who is your weakest link and who overestimates their capabilities?
Select an appropriate hike grade. (One is easy. Five is for veterans.)
Research your hike using current maps and expert advice. A geo-tagged photo on Insta is not research!
Calculate how long the hike will take based on length, group size, terrain, and grade
Consider the navigation skills required. Learn how to read a map and use compass and always carry them
Understand your environment, the season and associated risks
Play out emergency scenarios from a headache or twisted ankle to the worst case health scenario
Know how to access local emergency response via phone and/or radio
Power down or safe-mode your phone to conserve your battery
Do not rely on your smartphone for navigation or expect you’ll have reception. Batteries go flat, phones break or can be lost
To save your phone battery consider a separate camera to capture those social media shots
Remain on marked trails to reduce your impact and chances of getting lost
Leave no trace – what you take in, take back out
Check current weather reports but do not rely on them. Conditions change rapidly and to extremes, often contrary to forecasts
Pack extra food, water, clothing, and equipment
Abort if the forecast looks bad. Heatwaves, bushfires, floods, extreme wind, or extreme cold increase your risk
Carry a separate light source (not your mobile phone) to aid search and rescue, particularly from the air
Leave a copy of your hike plan and map in your vehicle and with a reliable contact. Always notify this person if you change your plans, and when you return
If you don’t have a personal locator beacon (PLB), get one. If you do have one, make sure it’s registered and register your intentions on all remote hikes. PLBs should only be activated if your emergency warrants extraction. A PLB is not a get out of jail free card
Do you need other communication aids such as a Sat phone, Explorer or spot device?
Okay I’ve been dancing around the big one but let’s go there … always ask the question, “How could I die?”
Losing my life on a hike is always at the back of my mind because staying alive is the focus of my planning.
I’ve challenged many less experienced hikers while hiking with this question, ‘If your phone went dead, would you know where you are and how to get back to your car?’ I know it sounds cruel but the reactions have ranged from nonchalance to outright fear when they realise how deadly the situation could be.
Don’t assume your hike leader is competent and prepared. What if they’re injured or separated from the group? What if they over-sold their abilities? What if they died?
How to survive if things go pear-shaped
Don’t panic! Panicking wastes energy and leads to poor decision making
Stop, stay calm and think
Separated from your group? Shout out then wait for a response. Don’t run blindly towards where you think they might be
Retrace your steps a short distance and see if you can find the trail
Check your map and try to determine where you are by the contours and your compass. You might need to gain some height for orientation
If you have no idea where you are, STAY WHERE YOU ARE!
If you’re in a group ALWAYS STAY TOGETHER! There is safety in numbers and rescue teams don’t need to be searching for multiple groups
Make a cuppa to help you relax (there’s a teabag in your survival kit)
Make your position visible to rescue teams by placing bright items (pack cover, bright clothing etc.) in an open and clearly visible area
If you believe your life is at risk, activate your PLB
It can take time for rescuers to reach you, so your priority is to find shelter and keep warm and dry, but remain visible
Find a water source if it’s safe to do so and ration your food and water if necessary.
Be aware of your limitations and don’t hike beyond your abilities. Use every hike as an opportunity to develop your skills and knowledge. You can learn something new every time you pull on your boots. I have plenty of “wish list” hikes and I’m still developing my skills on shorter or similar hikes to one day tackle each of them.
Aussie bushwalking’s been forged through passionate and well informed clubs… why don’t you consider joining one of them?
However you tackle the bush, here’s my simple plea; plan and don’t put your life or others at risk. It’d be a damn shame to miss out on your next big hike.
Author
Darren Edwards Darren Edwards has been a keen bushwalker for more than a decade. He’s the founder of Trail Hiking Australia, a community project delivering free online resources to more than 80,000 members. Darren’s a graphic designer by trade but loves nothing more than shutting down his computer, pulling on the boots and venturing into our amazing wilderness.
Check our Darren’s site, Trail Hiking Australia. Over 3,200 trails, tips and helpful hiking advice. www.trailhiking.com.au
Advice for beginners picking out their first bushwalking footwear.
As 2020 draws to a close, Queenslanders are breathing a collective sigh of relief. With many of us being in lockdown and having to social distance, we missed out on a lot of time with family, friends and colleagues. However, one bright spot to come out of the COVID-19 pandemic is the fact that many of us took to the great outdoors when times were tough. With her excellent views and endless opportunities for social distancing, Mother Nature became a source of solace for many people. As a result, we have plenty of new bushwalkers set to join in the fun in the coming year.
Being in touch with nature is wonderful and walking offers numerous benefits. However, it’s also of the utmost importance to ensure you’re equipped with the proper gear to keep yourself safe and comfortable. On that note, let’s take a closer look at the best advice for beginners picking out their first bushwalking footwear.
Why Do You Need Proper Shoes For Bushwalking?
You need proper shoes for almost any activity—basketball, tennis, running; you name it! Bushwalking is no different. Proper shoes will ensure your feet and legs are protected as you embark on your journey.
The rigid sole of bushwalking shoes is quite thick. This helps to prevent injury to your feet, knees and ankles as you cross rugged terrain with a backpack. Proper bushwalking shoes evenly distribute your weight and the weight of your bag, making for a safer, steadier, more comfortable walk.
Bushwalking shoes are also designed to protect your feet while letting them breathe, and keep bugs, insects, and small, sharp rocks out. They lace up well above your ankles and create a barrier against external elements. This is especially important if you’re walking in areas where there are snakes or spiders, as they won’t have easy access to your feet. It also means you can tuck your pants into the top of them for added protection, which is something you can’t easily do with trail running shoes.
Plus, purpose-designed bushwalking shoes are far more durable than regular footwear, so they’ll last significantly longer outdoors than regular trainers or sneakers.
The Differences Between Trail Shoes And Hiking Boots
Hiking boots have thick lugs that can gain traction in soil and a variety of other surfaces. Trail shoes offer minimal traction but grip on the fly. However, they won’t have the same level of traction that hiking boots have when moving at a slower pace.
Hiking boots offer foot and ankle protection when bushwalking. Trail shoes are lightweight to ensure a fast pace can be maintained for longer mileage.
Trail shoes are designed to be versatile for several uses, whereas hiking boots are heavier, and specifically designed to slough off mud, water and snow.
If you’re bushwalking in a colder climate, hiking boots are more practical as they keep your feet warmer. However, if you’re in a warmer climate, trail shoes make for a cooler option.
Why Fit And Support Is Important
When it comes to bushwalking, blisters are the enemy, as are injuries. Therefore, the fit of your shoes and the support they provide is incredibly important. These factors need to be considered, as they go a long way towards helping you complete several hours of adventure. Your bushwalking shoes should fit snugly and not rub, and should keep your feet in place with every step. If your footwear doesn’t tick these boxes, you’re likely to have a painful and unpleasant hiking experience.
Wearing trail shoes or hiking boots that are comfortable, fit properly, and support your feet will prevent blisters and calluses, and reduce the chances of twisted ankles and torn ligaments. Fit and support in your footwear is important, as these factors can protect your joints by offering adequate shock absorption when you’re navigating tricky terrain. Without shock absorption, you risk sustaining serious injury to your knees and ankles. Just like proper cushioning in running shoes offers added protection for the feet and legs, the shock absorption properties of hiking boots do the same on rough terrain.
While all the above is to be considered, everybody is different, so there are no steadfast rules on fit and support. Some walkers prefer a more roomy fit and wear an extra pair of hiking socks, while others prefer a tight fit that doesn’t allow for any give. Just make sure whatever bushwalking footwear you choose fits properly and provides the necessary support.
Terrain Considerations
Again, when it comes to picking the best bushwalking footwear, there are no hard rules. Instead, it’s about finding the shoes that work best for you, and keep you safe and comfortable. Similarly, when buying bushwalking footwear, you need to consider the terrain you’re most likely to traverse.
Consider the following factors:
Will your feet get wet?
Will you need protection from plants and bugs?
Do you prefer a slower hike with plenty of ups and downhills?
Do you prefer fast-paced hikes with easy-going surfaces that can be quickly navigated?
The answers to these terrain-related questions will go a long way in helping you find the right footwear. If you require a sturdy shoe with thick protection because you’re likely to find yourself in rugged terrain, pick a hiking boot over a trail shoe. However, if you prefer fast-paced hikes with an easier faster to navigate surface, then a good pair of trail shoes is probably better suited for you.
Finding the best bushwalking footwear doesn’t have to be a difficult or daunting task. All you need to do is carefully consider where, when, and what you’re walking on, and what the different fit of each pair of shoes offers.
Whatever your choice of footwear, it will be a good investment if it suits the bushwalking adventures you’ve got your eye on. Over time, you’ll amass plenty of wonderful memories exploring the great outdoors—without the blisters, and with minimal insect bites!
Megan started her writing career specializing in educational copy in the fitness industry, covering a wide range of topics and is an editor for Find My Footwear. When she’s not writing, you can find her hiking the outdoors or signing up to run a 5K.
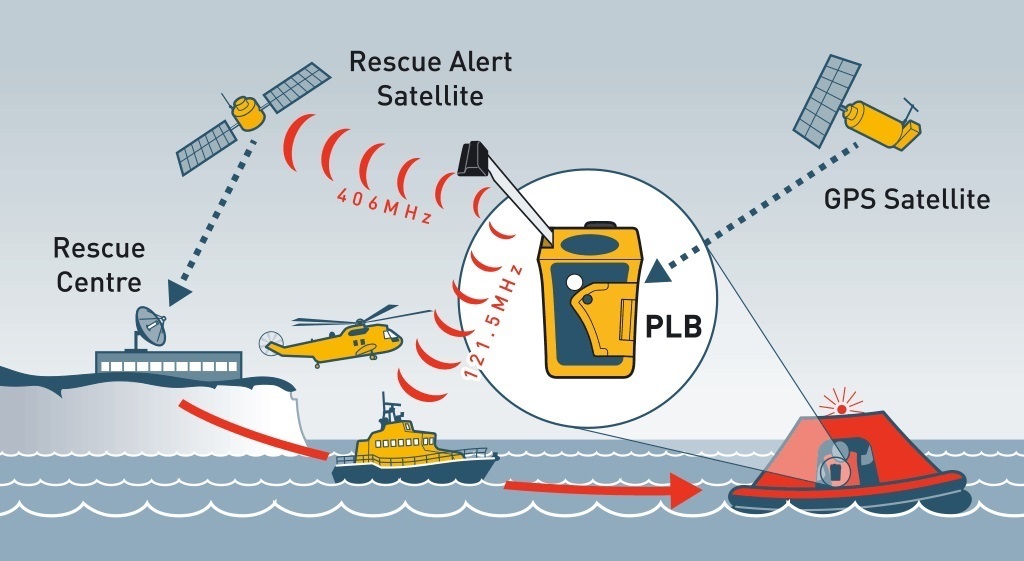
Personal Locator Beacons (PLBs) are that one thing all hikers should carry, but very few do. Not sure what a PLB even is? This WE ARE EXPLORERS comprehensive guide to PLBs and Satellite Messengers will help; how they work, and why you need one on your next adventure.
What is a PLB?
A Personal Locator Beacon (PLB) is a device you carry with you and can activate in case of a life-threatening emergency. PLBs don’t require cellular reception to work. Once activated, they connect with emergency services who are deployed to your location.
When should I carry a PLB?
In summary, always carry a PLB if you’re undertaking an adventure in which any one of the following applies:
There’ll be no reception
The activity is high risk (snow, heat, cliffs and drops, solo trips)
The potential outcomes are likely to be critical and time-sensitive
It’s an extended trip and people may not raise the alarm for many days or weeks
Self-rescue would be impossible, or no-one is likely to bump into you or send for help if needed.
What is it? A colourful, detailed guidebook packed with hundreds of shorter, easier, more accessible family-friendly bushwalks throughout South East Queensland, now with an added Toowoomba chapter.
This book is an ideal gift for the outdoorsy person in your life! (go Shopping!)
How is this book different from the other bushwalking guides?
It covers every qualifying bushwalk in the region
It’s bang up to date
It only covers easier, shorter bushwalks, no ropes required
It only covers easily accessible bushwalks, you don’t need a 4WD
Every bushwalk is illustrated with a brand new detailed topographic map
It has a family orientation – you don’t need to be a serious hiker to enjoy it
We walked (or cycled) every metre of these trails during our research
Following a few interesting experiences on the trail, I came to realise that a lot of people are either are not aware of or have forgotten correct trail etiquette. With so many of us on the trail these days, it is important that we can share the outdoors in a friendly and understanding manner.
In isolated hiking destinations, you may be fortunate enough to find yourself completely alone. However, on some hikes, particularly the popular trails, you will meet other hikers, mountain bike riders, horses and people hiking with their dogs. Courtesy, correct trail etiquette and common sense will make these encounters safe and a lot more enjoyable. Read on Trail Hiking Australia
Here are a few tips every hiker should keep in mind:
1. Hike Quietly
Hike quietly. Speak in low voices and turn your cell phone down if not off. Enjoy the sounds of nature and let others do the same. There is such a thing as noise pollution and someone who wants to engage in constant chatter is simply being disrespectful to others. If you want to talk all day about topics that interest you why not go to the pub instead?
2. Give Way to Uphill Traffic
Always yield to uphill traffic. If you’ve ever been plodding up a hill at a nice steady pace only to be run into by someone in a hurry to get down, then you understand the logic behind this. Going uphill is hard work, and changing your pace for someone racing down towards you can ruin your momentum. This is why people traveling uphill have the right of way. Of course, some hikers (like me) welcome any opportunity to stop and rest and we will often signal for downhill hikers to pass us. This happens a lot, just remember that it’s up to the person going uphill to make the call.
3. Stay to the Left, Pass on the Right
If someone is hiking faster than you, just let them pass. Don’t try to walk faster, then slow down, then walk faster, and so on. If you’re the one hiking faster, don’t hike on someone’s heels. Wait for an appropriate spot to pass and politely excuse yourself past them.
The trail is a lot like the road in this respect. Keep to the left side of the trail when you are being passed and overtake on the right.
If you want to pass someone from behind, get their attention by calling out ‘I’m on your right.’ You don’t need to be overly formal or gruff, and a friendly, “Hi there, can I pass you?” works just as well.
4. Leave No Trace
This rule can be observed in a number of ways.
The most obvious way is to clean up after yourself and pack out anything that you brought in. Even things like banana peels and apple cores can take quite a while to decompose and they don’t improve the scenery one bit.
This goes for dogs too. If you’re unwilling to clean up after your dog, then don’t take it out. No one wants to step in your dog’s little presents on the sidewalk, and the trail is no different.
Another way to leave no trace is to stay on the trail. You don’t need to prove your hiking prowess by cutting across switchbacks on your way up or down a hill. This can damage fragile plants, erode trails, and loosen rocks and boulders that may injure you or people below you.
Leave what you find. The only souvenirs a hiker should come home with are photographs and happy memories — and improved mental health and fitness!
When toileting in the outdoors, please do so 50 metres from the trail and 100m any water sources. Follow Leave No Trace principles when doing so.
If the trail is muddy or wet, walk through mud or the puddle and not around it, unless you can do so without going off-trail. Widening a trail be going around puddles is not good for trail sustainability. I have seen a lot of trails that are at least 3m wide in places due to hikers walking further and further around the swampy ground.
Learn more about the seven principles of Leave No Trace.
5. Stay on the Trail
It is important to move off the trail for views and breaks. When hiking in wilderness areas, it is important to protect the trails and stop the spread of disease. In other words, don’t take short cuts. This seems to occur most often on switchbacks, but is important at all points of the trail. This type of occurrence, not only damages the natural habitat of the newly traveled area; it can also become a safety hazard to other hikers where an unmaintained area can result in falls, twisted ankles, or unwelcome run-ins with animals and plant life.
6. Horses, Hikers, and Bikers
The first thing that you need to know is that there is a hierarchy on the trail. Horses have priority, followed by hikers, and then bikers. It’s pretty simple to remember and makes encounters much more pleasant when everyone knows who gets to go first. Always check to see what other kinds of travelers will be sharing the trail with you before you start. If horses or bikes are allowed, then be mentally prepared to encounter them.
When being passed by horses, it is important to step off the trail, on the downhill side if possible. This helps in two ways: it will help keep from startling the horses, and it will keep you from getting run over if they do get spooked. Horses are prey animals, and as such they are always on guard for threats from predators. Standing uphill from a horse may give it the impression that you are larger and more threatening than you actually are. So always try to stay downhill and stay relaxed. Talking to the rider also helps the horse know that you’re a human and not some mountain lion lying in wait. Horses also tend to bolt uphill when they are startled, so staying out of the way will keep you from getting squished.
7. Hiking With Your Dog
When hiking with your dog, the basic principle of trail etiquette is respect for others and for nature. That means – if dogs off-leash are not allowed, respect it. If it is allowed, do it only if you are confident your dog knows how to respect commands such as “come” and “stay”. Respecting the trail also means leaving no trace: and this includes your dog’s poop.
8. Tech on the Trail
The increase in the use of technology in our daily lives has led to a proportional increase in its use in the outdoors, so a few courtesies should be taken. For many, hiking is a chance to experience a little bit of solitude. While it is advantageous to have a phone with you in case of emergency, having full on conversations while on the trail can be distracting and annoying to fellow hikers. Keep a fully charged phone with you for safety reasons, but keep it on silent, and use it to snap some great photos that you can look back on later.
9. Be Friendly and Have Fun
Your fellow hikers are out to have a good time just like you are, and a friendly “gday” or “hello” can go a long way toward fostering a positive atmosphere among everyone on the trail.
The Ten Essentials are survival items that hiking and Scouting organisations recommend for safe travel in the bush.
The Ten Essentials first appeared in print in the third edition of Mountaineering Freedom of the Hills Mountaineers (January 1974). Many regional organisations and authors recommend that hikers, backpackers, and climbers rigorously ensure they have the ten essentials with them. However, personal preferences and differences in conditions may dictate otherwise and with experience most adventurers add and subtract from the list depending on the situation. Some lightweight hikers do not always carry all of the items and believe it is an acceptable risk they take in order to travel light and fast.
According to the eighth edition of Mountaineering: The Freedom of the Hills book there are ten essentials, which are now referred to as the “classic” essentials. While still valid and widely used they do not reflect modern outdoor sports and all of the new gadgets that now are common.
Classic Essentials
Map
Compass (optionally supplemented with a GPS receiver)
Sunglasses and sunscreen
Extra clothing
Headlamp (or torch)
First-aid supplies
Firestarter
Matches
Knife
Extra food
In 2003, the essential list was revised as part of the seventh edition of Mountaineering: The Freedom of the Hills to keep up with modern equipment. The current edition, 8th edition continues with the new essentials list with no major revisions. The new list takes a “systems” or functional approach.
The textbook recommends supplementing the ten essentials with:
Portable water purification and water bottles
Ice axe for glacier or snowfield travel (if necessary)
Signaling devices, such as a whistle, mobile phone, two-way radio, satellite phone, unbreakable signal mirror or flare, laser pointer.
Some experts recommend having duplicates of the Essentials in different sized kits: in pockets, on key rings, in pocket kits, belt pouches, belt packs, day packs, and backpacks.
17 Trail Games And Hiking Activities For Kids And Adults
Some people can hike for hours without losing interest in the sights and sounds of the trail. Some like to disconnect by listening to their favourite tunes, while others need something extra to keep them motivated. If you’ve ever been hiking with kids, you’ll know how important it is to keep them entertained while hiking, which is wear trail games come in! …
The best hiking games for kids and adults aren’t just fun, but they’re educational too. You can use hiking games to teach and learn about plants, wildlife, and environmental responsibility, or to practice essential backpacking skills such as map reading. Trail games are useful ice-breakers too.
The Sea to Summit guide to personal hygiene It’s important to know how to take care of business out on the trail. While it’s no big deal to stink, it’s another thing to end up with a nasty stomach bug in the middle of nowhere because you didn’t know any better.
Contents
Plan ahead and prepare
Travel and camp on durable surfaces
Dispose of waste properly
Leave what you find
Minimise campfire impacts (be careful with fire)
Respect wildlife
Be considerate of traditional landowners and other visitors
With cooler weather and being outdoors, what you wear is important. The way to dress for whatever the weather throws at you is by layering your clothing. You need to dress for the elements. The layers apply to summer and winter, but we are going to focus more on keeping warm. And this is the guide to help you do it right!
A journey of a thousand miles begins with one step – and some careful planning.
Queensland’s wild heart is best explored on the hiking trail. But there are hiking trails, and then there are Great Walks.
Let’s be clear: Queensland Great Walks are more than just really long, overnight hikes. They take you far from the normal tourist tracks and deep into our national parks.
These tips will put you on the right path and show you how to plan your hike.
One of the main reasons people go hiking and camping is to get away from the hectic urban and suburban world of their everyday lives. Getting out in nature, miles from civilization, and enjoying the company of wild animals and crickets.
Of course, when you’re outside of civilization, you don’t just escape the pitfalls of modern life. You also give up the benefits, like hot and cold running water, air conditioning, and easy access to medical care.
Most outdoor enthusiasts are fully prepared for the first two sacrifices, but nobody gets excited about how far they are from the nearest emergency room. Here’s what you need to know if worse comes to worst and you need to treat injuries on the trail.
Australia like several other countries in the world has a reputation for serious bushfires. A basic understanding of bushfires is useful if you are a bushwalker or spend time in the outdoors. Read More
It may seem like harmless fun and make for a great picture, but experts are warning the rock stacking trend is putting endangered Australian animals at risk.
Rock stacking is when people go to rivers, beaches or national parks and collect rocks to make sculptures.
There are more than 70,000 posts using the #rockstacking tag on Instagram, often taken in pristine environments.
Yet a senior ecologist at the Victorian Government’s Arthur Rylah Institute, Nick Clemann, said the trend could have a devastating impact on some endangered species. Read More
Personal locator beacons (PLBs) are devices that transmit your location via satellite to emergency services. They are used in life-threatening situations to signal that emergency help is required (e.g. group is lost, someone is injured or very unwell), and usually only activate when other forms of two-way communication such as a phone call cannot be made (e.g. group is out of mobile phone reception).
PLB’s are lightweight, small and practical, suitable for bushwalkers to carry on their person. They are an important safety backup for groups traveling through areas with poor or no mobile phone reception, and have been proven time and time again to be a life-saving device for bushwalkers. (Source: National Parks Association of NSW)
There’s nothing quite like that feeling you get from stepping off the pavement, away from the hustle and bustle of everyday life and venturing out into the wilderness. The fact is, we all lead busy lives so for many of us, going out for a short bushwalk or day hike is all that we can manage.
Comprehensive checklist of what to take on a day hike (with options!) for Australian conditions. That’s right, no bears here, so this checklist is designed to help you pack what you need and need what you pack.
Comprehensive packing list, broken down into categories, to help you pack what you need and need what you pack for overnight hiking adventures in Australia. It includes comments and prompts to help you make wise choices.
Hiking is an interesting and active hobby to start at any time in your life. There are many different types of hiking for every sort of terrain and skill level. Depending on where you live and what experience you have hiking you could have a really fun hobby with plenty of new trails to try.
Hiking for beginners is not the same boring process that beginning other hobbies can be. Starting hiking just means you shouldn’t try the hardest trails yet and you shouldn’t hike alone. It never means that you need to start on boring, flat trails with no interesting sights.
As more people get active and go outside, hiking grows in popularity. That is because hiking is fun and never the same. Here are a few tips for people who are just starting their hiking journey.
Know Your Limits
The longer more complicated trails might seem like a more fun place to start. They will not be fun at all if they are above your skill and fitness level. Pick your first trail carefully with what your body is ready to do in mind.
You do not need to pick a super boring trail, but you should take your own fitness and knowledge of hiking in mind. It is hard to find a boring place to hike and there are trails for every level of fitness and experience. Find one you know you can complete to start with.
Wear Good Gear
Do not go hiking in flip flops and cotton pants. It is a good idea to buy specific hiking shoes for the type of trails you intend to go on. You should also buy some sweat-wicking fabric that will keep you cool while you hike.
Hiking in or with the wrong gear could easily ruin a hike. Wear a good pair of boots or hiking sandals from viakix to keep your feet comfortable for your whole hike. You do not want to end up freezing, covered in sweat, or with blisters.
Check The Weather
This might seem obvious but you would be surprised how many hikes are ruined because no one thought to check if it would rain. Knowing what weather you are hiking in is an important part of preparing for your hike. It lets you know what you are getting into.
Checking the weather also prepares you for what to wear. If you are planning on a hike that will go a few hours and the weather is going to get hotter then you should have a light jacket to start and something cool under it. Knowing what gear you need for the weather will help your hike stay fun.
Pack The Essentials
There is a list that every hiker should know that gives an idea of what they need to pack before a hike. A few of the basic items might change depending on the weather but the list itself remains solid. Packing those things will ensure a safe, successful hike.
It might seem like a lot to carry on a hike but it really isn’t. Get the lightweight and travel size version of all the items and carry a lightweight backpack with you on all your hikes. Having a designated hiking backpack with all the essentials in it will help you always feel secure on a hike.
Phone A Friend
If you are hiking alone or even with a small group you should always tell someone who is not hiking with you exactly where you will be. Informing a friend the exact place you will be and when you should be back will help them know if they need to call for help and give you peace of mind.
You will want to write down the name of the place you will be and which trail. Tell them when you get there and what time you should be done so they know if you are late or missing. Make sure you tell them when you are done and safe to prevent a lot of worry on their part and an awkward police visit on yours.
Bring Snacks
Water is probably the most important thing you can take with you when you hike. Dehydration is not fun and can be deadly if you aren’t careful. Packing about two pints of water for every four miles is a good way to make sure you have the right amount of water for the hike you have planned.
Bringing a few cheese crackers or granola bars is also a good idea. Depending on how long you take on your hike you might be outside long enough to get hungry. Also, a snack is just a good idea anytime you leave the house in case you feel sick or get a little lost.
Know Your Trail
Do not go hiking blind. That is a good way to end up on a trail that is too difficult or that you don’t know where it ends. It is important to look up a map of the trail you are going to hike before you go.
You should have a map in your backpack but you don’t want to be learning where you are for the first time when you get there. You need to know where the trail leads, how difficult it is, and how long it will take a beginner.
Going in blind is a good way to get lost or hurt. Make sure you do your research before you go so that you don’t end up on a very stressful hike. Knowing your trail is a good way to keep a hike fun instead of scary and too hard.
Leave No Trace
This is a tip you will find on just about every hiking website you go to. It is one of the most important rules of hiking and outdoor sports in general. You are out there to enjoy nature not to leave a mark on it.
It is important you leave the trail exactly as you found it or cleaner. If you find garbage pick it up and never leave anything you brought on the trail. Leaving the trail as you found it with no trace of your presence is one of the most important rules is hiking.
Conclusion
Hiking is a great, active hobby to pick up. The difficulty level can be found for you no matter your fitness level or what difficulty you are willing to try. There is a trail for everyone.
Being prepared for your hiking trip is important. Making sure you are dressed for your hike, have a pack ready, and have plenty of water is the best way to make sure your hike is fun. Make sure you know what weather you will encounter and what sort of trail you are hiking.
Hiking can be so much fun and a life long hobby. Taking care of the trails is the best way to keep hiking beautiful for every person who goes on the trail. Leave no trace and stay safe on your hiking adventure.
Packing the “Ten Essentials” whenever you step into the backcountry, even on day hikes, is a good habit. True, on a routine trip you may use only a few of them or none at all. It’s when something goes awry that you’ll truly appreciate the value of carrying these items that could be essential to your survival.
The original Ten Essentials list was assembled in the 1930s by The Mountaineers, a Seattle-based organization for climbers and outdoor adventurers, to help people be prepared for emergency situations in the outdoors. Back then, the list included a map, compass, sunglasses and sunscreen, extra clothing, headlamp/flashlight, first-aid supplies, fire starter, matches, knife and extra food.
Over the years, the list has evolved to a “systems” approach rather than including individual items. Here’s what it looks like today: The Ten Essentials
Fastpacking focuses on traveling fast and light through the backcountry, usually for more than one day. It’s similar to ultralight backpacking. The sport has attracted day-hikers, backpackers and trail runners who want to travel light and go further.
If you have a yearning to head out in to the wilderness on a day hike, you have come to the right place. Being prepared for a big day walk, is the difference between being immersed in an adventure that you enjoy, versus hating every minute of it! Here are a few things to consider when planning your next adventure on foot:
Train/hike in your gear in the weeks leading up to your big walk. Wear comfortable, well fitted trail shoes/trail runners or lightweight hiking boots or walking shoes with good, grippy Vibram sole. “good fit” means you have some space at the front of the big toe, even with a good pair of merino hiking socks on; your toes don’t hit the front of the shoes when you are on a steep incline/descent; your feet don’t slide in and out at the heel. Good quality socks (no cotton) that wick away moisture, coupled with a pair of hiking shoes that have been fitted for you, can make ALL the difference and prevent debilitating blisters.
Research the climate/weather/trail difficulty and trail notes and maps before you go. Be prepared to change your plans if the weather conditions do not look favourable for being out there all day. Know where there are access points along the route in case you need to exit before the end point. Don’t just look at the number of kms but also the gradient of the trail and how many climbs there are. Kms become A LOT slower when you are climbing a steep ascent or having to slow don to get down a steep rocky/scree descent. Your speed/kms per hour are also affected by extreme weather conditions – like humidity, heat, rain or cold. The trail conditions will affect this too – so read up on the latest trail updates. All these need to be factored in to your timing. Rather start out earlier in the day and allow an extra couple of hours on top of your estimated time on trail. You can always spend some time at the end enjoying a rest if you finish earlier than expected.
Your daypack should be around 30 litre capacity.
You should have between 2-4 litres of water depending on the climate and your own needs – some people sweat alot and others drink more. Take some electrolytes to alternate between water and electrolytes especially if it is a hot day.
Take enough food that you can snack on small bites every 45 minutes to an hour. A mixture of sweet and salty, fruit, and dried goods, but not foods that sit heavy in your stomach.
First Aid kit, including stiff bandage, strapping, wound care, snake bandage, eye wash, eye drops, band aids, personal medications and asthma treatment if required.
Head torch (even if you think you won’t be walking in the dark, many people have underestimated their walking time and been stuck out in the dark.)
Pack layers of clothing, depending on climate but always expect in the mountains that the weather can swing between extremes.
Always carry good quality rain gear, that you have pre-tested in the rain and cold. Carry a blister kit – special blister plasters, tape or foot fleece that you have tried in training. A small towel if you intend to swim on route.
Tissues. Lip balm, suncream and sun hat and shirt.
Bandana to protect your neck, also can wet and use to cool yourself when it is hot.
Lightweight, sealable eco friendly bag to carry out rubbish, including vegetable matter.
Tell someone where you are going: log your route plans at the National Park if required. Pay for the relevant National Park permits if required before you go.
Know your own ability. Don’t overestimate how fit you are, or how agile. This is why training on trails in the lead up to your hike is so important. It helps you to gauge your fitness/agility so you are better prepared for the challenging terrain you may encounter. When estimating how long it might take to walk a trail, add in breaks. Read blogs and other trail notes and info on the planned walk to gauge time on trail.
Never walk alone.
Carry a Personal Locator Beacon if you will be out of mobile phone range.
Use walking poles: practice with these in training. They can reduce the impact on your lower limbs significantly and also help with endurance – imagine your legs doing all the work, vs spreading some of the energy expenditure to your arms and upper body, especially when you need a push to get up a big incline.
Immerse yourself in the wilderness and enjoy the freedom that comes with this: take photos on your phone, but the rest of the time, try to clear your mind of scattered thoughts and worries, Instead become curious about the surroundings, focus your attention on nature, breathe the fresh air, stretch during your breaks.
Allocate one person in the group to be responsible for time keeping, and one to be on maps/route/navigation. Don’t be too proud to acknowledge if you aren’t making good time or you aren’t sure of the route. Make decisions to turn around and go back, or rework your plans for the day, before it’s too late.
Being prepared for a hike makes ALL the difference and also gives you the opportunity to be immersed in nature, rather than struggling through the day with ill-fitting gear, or feeling unfit and unable to enjoy the experience. Just like any goal, the journey to get there is just as important as the destination.
As always, leave no trace: take all your rubbish with you, be respectful of traditional land owners, historical sites and all flora and fauna. Step lightly and take nothing but photographs.
Find out more trek tips on how to Get Trek Ready HERE.
Hiking shoes come in many shapes and forms. What you’ll need in a hiking shoe is wholly dependent on what type of hiking you do, the weather conditions you often face, and your personal preferences. That being said, there are no hiking shoes out there that can do it all … read more
How to Ensure Your Clients Have Access to Safe, Clean Water
Nothing ruins international adventure faster than a stomach bug. According to a 2015 article published in Australian Family Physician, 20-50 percent of travelers will experience travelers diarrhea (TD) as a result of ingesting unsafe food or water. To avoid joining the unfortunate statistics, it’s important for tour operators to learn the basics of waterborne pathogens and how you can help your clients (and yourself) avoid unnecessary and unpleasant toilet time.
What Causes Traveler’s Diarrhea?
TD is most commonly caused by ingesting contaminated food or drink. In particular, water can be contaminated by three primary pathogens (aka “bad germs”):
1. Bacteria – Includes E. coli, dysentery, leptospirosis, typhoid, and salmonella.
Bacteria is the most common cause of TD, but bacterial illness usually only lasts a few days. However, if untreated, both dysentery and typhoid fever can be fatal. Luckily, virtually any water filter removes bacteria from drinking water.
2. Protozoa – Includes giardia and cryptosporidium.
A common fear of backcountry travelers, protozoa like giardia are usually not fatal but are certainly unpleasant. The small size and toughness of the protozoa eggs (cysts) make these pathogens more challenging to treat than bacteria.
3. Virus – Includes norovirus, rotavirus, hepatitis A, and SARS.
Viruses are the least common cause of TD but the most deadly of waterborne pathogens. Untreated, viral infections can cause serious harm and potentially be fatal. And unfortunately, viruses are the most difficult of pathogens to remove. Only a small percentage of water filtration systems available to travelers will capture these nasty culprits.
How Do Operators Ensure Clients Maintain Good Health While Traveling?
First, take steps to educate yourself on waterborne illnesses and make sure your clients are well aware of the risks associated with a destination’s water quality. A good (albeit conservative) resource for information on water quality by country is the Centers for Disease Control and Prevention (check out this map graphic based on its information). Secondly, and most importantly, ensure you and your clients are informed about the risks before traveling and have convenient, self-reliant access to safe drinking water wherever the tour leads.
What Causes Traveler’s Diarrhea?
TD is most commonly caused by ingesting contaminated food or drink. In particular, water can be contaminated by three primary pathogens (aka “bad germs”):
1. Bacteria – Includes E. coli, dysentery, leptospirosis, typhoid, and salmonella.
Bacteria is the most common cause of TD, but bacterial illness usually only lasts a few days. However, if untreated, both dysentery and typhoid fever can be fatal. Luckily, virtually any water filter removes bacteria from drinking water.
2. Protozoa – Includes giardia and cryptosporidium.
A common fear of backcountry travelers, protozoa like giardia are usually not fatal but are certainly unpleasant. The small size and toughness of the protozoa eggs (cysts) make these pathogens more challenging to treat than bacteria.
3. Virus – Includes norovirus, rotavirus, hepatitis A, and SARS.
Viruses are the least common cause of TD but the most deadly of waterborne pathogens. Untreated, viral infections can cause serious harm and potentially be fatal. And unfortunately, viruses are the most difficult of pathogens to remove. Only a small percentage of water filtration systems available to travelers will capture these nasty culprits.
Safeguard Against Waterborne Illness Without Creating Plastic Pollution
For travelers, the most common way to ensure safe drinking water is to purchase water in single-use plastic bottles. Unfortunately, this solution has created a huge problem with waste and pollution in countries around the globe. Luckily, there are other ways to ensure your clients have access to safe drinking water wherever they travel — on and off your tour — and that’s with a personal water filter plus purifier.
While there are several methods and devices for treating unsafe water, it is important to understand the pros and cons for each and to choose an appropriate method of treatment. It is important to note, a water purifier is the only product that can protect against the broadest range of water contaminants.
Boiling
Pros: No special tools needed; kills all pathogens Cons: Slow (including time to cool); doesn’t remove chemicals
Chemical treatment (chlorine, iodine, bleach, etc.)
Pros: Small and easy to carry; a great backup option Cons: Does not kill protozoa (crypto, giardia); tastes bad; may not work in cold or cloudy water; slow (30+ minutes); does not remove chemicals
Ultraviolet light (UV)
Pros: Small and easy to carry Cons: Does not work in cloudy water; does not remove impurities and particulates; does not improve smell and taste
Camping filter
Pros: Available in several forms; light and small Cons: Does not remove viruses; some do not remove chemicals
Travel purifier
Pros: Removes all pathogens; some remove chemicals Cons: More expensive than more basic filters
This is an overview of various methods and the contaminants removed, with green indicating “yes” and red indicating “no.”
Yes, there’s a better way to put one foot in front of the other. Improve your stride, trek farther, and end leg and back pain with our guide to the new science of healthy hiking. READ MORE
“Backpacking used to be a necessary part of survival,” notes author and back-pain specialist Esther Gokhale, who has studied healthy sitting, standing, and walking postures in native cultures in India, Africa, and South America. People have been doing it for millennia. It’s in our DNA”
Scroggin has always been an integral part of Mike’s outdoors life and it calls up memories of long days on the trail and fleeting restful mid-crag moments. Here he digs deep into a bag of (sometimes unidentifiable) deliciousness and comes up with a handful of the history and science behind every adventurers favourite snack.
It’s the dark side of heading into the wild. The call of nature, urgent and demanding, hits you in the gut. The coffee and scroggin behemoth deep inside of you begs to be laid. It sounds daunting, but learning how to poo in the bush isn’t nearly as bad as it sounds.
If you are an outdoors lover, and a dog lover then there is nothing more wonderous than bringing your four-legged friend along on the trail.
Please make sure you check the rules around taking dogs into National Parks and other green spaces – and always keep your dogs under control! Remember our koalas!
The smell of rain, petrichor, is proven to have a soothing effect on people.
You burn more calories during outdoor activities when it’s raining.
Humidity makes your skin healthy, clean, and fresh.
In this article, you’ll find the most useful tips applied by professional thru-hikers and learn how to protect your glasses, set up a tent, and dry your clothes as an experienced adventurer.
So your hiking addiction and geographical location has sparked the interest of friends and family. People officially call you ‘that hiker chick or dude’ behind your back. Congrats! You will now be showered with friends and family hoping to hike with you to get those perfect mountain views you are always boasting and posting about.
Hiking with people that rarely or never hike can be a freakin’ awesome experience if the hike is approached with a pinch of patience and some much-needed enthusiasm.
Everyone starts out as a beginner hiker but not everyone has a close friend or relative that can coach them on the basics of hiking. Get excited that someone wants to join you on a hike. Share your gear and your knowledge. Ultimately, you should awaken your inner mountain trail guide.
Hiking with a newcomer can be crazy fun. Find gratitude in your geographical place. Those new to hiking seem to find more value in every single boulder and every single tree, especially the friends and family that live at lower elevations or live in a city.
Apply these tips below while hiking with a novice hiker and the hike should be very enjoyable for the both of you. If this first experience goes well for them, they will want to continue exploring mountains and, with some practice, you might just have the perfect hiking buddy!
1. Be informative before the hike
Some of your guests might be coming from out of state and some might be coming from just a block away. Whatever your unique situation is, inform them of what to bring and wear before you two hit the trail. Your friends and family might not have much to contribute when it comes to hiking gear but you can still tell them to avoid cotton and wear athletic shoes with adequate grip. Recommend some tasty trail snacks. Inform them that checking the weather beforehand is very important. Emphasize the need for an early start.
2. Allow time for altitude adjustment
The first thing to do is to make sure your friend or family member adjusts to the altitude difference if they are coming from the land of the flat and low. Give your friend a couple days to adjust but still keep things active like biking in the city or walking a flat trail at a park or natural area nearby. It is important to at least get your guest’s heart rate pumping at your home’s elevation before you hike to a higher elevation.
3. Go on a hike you’ve never done
Make this hike just as enjoyable for you as it will be for them. Give yourself new views too by doing a hike that you’ve never done or do your favorite summer hike in fall or winter. However, always research the trail beforehand so you know what kind of terrain and difficulty to expect. Make sure the hike is great for beginners and ALWAYS hike a scenic trail; make the hike worth the view at the end. Also, in my personal experience, many novice hikers want to know ‘what is next’ in terms of terrain and views. They want to know when it gets hard or when it flattens out, etc. If you’ve never done the trail, this reduces the frequency of those questions.
4. Choose a hike relative to physical ability
This tip is very, very important. If you are an active hiker, hiking ten miles might actually be no big deal for you. However, ten miles of hiking is hard on nearly all beginner hikers. You must consider their physical ability and the hike’s terrain, length, and weather. Not every beginner wants to hike more than a couple miles and you must be aware of that. Keep in mind that some beginner hikers are already more advanced than others. If your friend is an active runner or biker, for example, than this beginner hiker might be able to handle tougher terrain than someone that does not do much physical activity.
Furthermore, accept their input on the type of trail and the mileage. If they want to do a five mile (or less) valley trail, then you shouldn’t be forcing a lengthy mountain ascent.
Some active friends might actually say, “take me on a hard hike.” Show them a challenging and fun time but still keep in mind that they are new to this. Ease your friend into hiking. We must remember that hiking isn’t just about walking up a slope and cardiovascular activity. It is also about technical foot placement and the ability to read rocks for one’s body during bouldering and scrambling. These techniques are learned after some practice. Some beginners excel at this more than others but all beginners still lack speed and patience. So if you have a friend wanting a difficult hike, take them on a hike with some spots of bouldering and rock hopping but make sure you do not over-do the hike with too much strenuous activity that your friend becomes annoyed and frustrated.
Personal note: My sister-in-law, an ex-gymnast, did great hiking a difficult hike for ten miles. She did well in technical foot placement but struggled a bit on reading the rocks for the most efficient path for her and, therefore, her speed was slow. My triathlete cousin was able to complete a fairly difficult 12-mile hike. She did not have a problem with busting up switchbacks but she was slow at the end when it came to rock hopping and technical foot placement.
5. Describe the hike before departure
Once you have chosen the trail, describe the hike to them. Let them know what they should expect in regards to mileage, terrain, weather, and views. Gauge their response. If they aren’t totally excited about hiking eight miles, then you might want to consider a different trail. This is also when I tell them how long I think it might take (don’t forget to include enough time for many breaks within this time estimate).
6. Remember the essentials
Okay, I know you are a professional and I don’t mean to condescend your amazing hiker-ness but, for real, don’t forget the essentials. Forgetting something like sunblock will make any newcomer to hiking hate you and hate hiking and hate mountains and hate life. Just remember to bring water and food and a first aid kit and a map and chapstick and a rain jacket and an extra pair of socks…..
I think I’ve gotten my point across here.
7. Loan your gear
Loan your gear to your guests but do be picky on what gear they will use. A beginner hiker is more focused on his or her footwork, body movements, and views than the safety of your expensive, new pack. Let them use your ‘used’ gear, not your new gear. They will simply be grateful that you have spare gear in the first place.
Personal note: When I have guests, I actually have guest trekking poles, guest packs, guest wind/rain jackets, and guest hiking shoes (for select sizes). All guest gear is mine and my fiancee’s past gear that is still fully functional but we won’t die of sadness if a gear mishap does occur.
8. Teach the way of trekking poles
The art of trekking poles is just that, an art. When used correctly, trekking poles make things a lot easier while hiking. A couple of my friends have said that they never want to hike without trekking poles after hiking with poles for the first time with me.
Before you set out on the trail, educate a newcomer about trekking poles and how to properly use them to become the most efficient hiker. Tell them to bear weight on the strap (or not depending on your preferred technique) and inform them how to correctly use them on ascents and descents.
When it comes to scrambling, most beginners feel more comfortable not using trekking poles because they lack the balance and confidence needed to jump from rock to rock. They feel more comfortable to use their hands and you should cater to your beginners request if this terrain and situation arises.
9. Be mindful
Don’t just boss hog up the mountain like a bat out of hell. If you are a quick hiker, it might be best for your friend or family member if you hike behind them. Nothing is more annoying and tiring than trying to chase after you on an uphill. If you hike behind them, it reduces the inferior feeling of slowness that some (or all!) beginner hikers eventually face. Your friend will most likely apologize for being slow but accept no apology. You should expect the pace to be slower than what you are used to and that is okay. Enlighten them on those rough days before you got hiker legs of your own. Always remind them that you were a beginner hiker once too.
Cater to the novice mindset. I am always pleasantly and happily surprised when my friend wants to actually hike longer than expected but don’t be disappointed if you didn’t make it to the summit or decide to cut the hike short. Be aware of their energy level and always ask how they are feeling physically.
10. Carry the bulk of the weight
In regards to a day hike, a hiker-in-learning should only carry his or her water, their clothing, and a few go-to snacks. If you are carrying the bulk of the weight, this will make your friend a bit faster and will slow you down a bit too! When it comes to a backpacking trip, still be mindful of how much your friend or family member is carrying. Teach him or her how to properly pack a pack and also inform him or her of what they don’t necessarily need to bring. Give them a great shake-down! Depending on the personality of your friend or family member, they will want to carry all their own gear or not but, essentially, you two will figure out very quickly what works in regards to weight once you start your backpacking trip.
11. Be knowledgeable
Okay, you hike a crap ton so I know and they know that you are knowledgeable about hiking and gear. Share this knowledge. Tell them why you choose to do this over that. Let them know your favorite hiking brands and what to invest in when (or if) they start looking for their own gear. Inform them about Leave No Trace policies. Educate them on bad weather protocol. This is especially important. If you instill these policies on their first hike, then they are more likely to implement them in the future.
Furthermore, be knowledgeable about the nature of your home state. Every single visitor I have taken hiking always asks me to identify rocks and plants and animals. I know this might be asking a lot but knowing the flowers, trees, rocks, and wildlife truly is a great thing to know as an avid hiker and amateur trail guide.
12. Take a lot of breaks
Breaks, breaks, breaks! Taking breaks are especially important. Without breaks, hiking can be seen as a strenuous activity instead of a fun adventure. Make sure you are implementing break times by being fully aware of both of your energy levels. Watch for clues of exhaustion such as a slowed pace or a sad face! Stop at view points, take pictures, and consume lots of snacks. I have come to find that I sometimes must force food on newbie hiker friends. Their body is experiencing something new and the signal for hunger doesn’t always come. Make sure they are getting enough fulfilling calories during these breaks.
13. Take lots of photos!
Okay, let’s be honest here. One of the only reasons your friend decided to hike with you today is to get those badass mountain views AND to get proof that he or she was there and viewing those badass mountain views in person. I like to take ‘action’ shots of my friends and family while they are hiking. Definitely get a few posed pictures of the two of you but don’t forget to snap a few where they are seriously doing some hiking work!
14. Be patient
The purpose of hiking with a beginner hiker is to educate them on ways of the trail, introduce them to this awesome activity, and to spend some quality time with them in nature. Cease your frustrations with pace, weather, or the few complaints that might be thrown your way. Approach the activity with patience and gratitude. In reality, it doesn’t really matter if your friend or family member can’t complete a hike. What matters is that he or she was willing to enter your world and share a hike with you.
In essence, I wish every newcomer to hiking had a friend or family member to show them the ropes to avoid beginner mistakes. Hiking isn’t just a physical activity; it is a way to connect with nature. As avid hikers, we must act as stewards to the trail by educating our interested family and friends about Leave No Trace policies, gear, and nutrition.
Too often, we see people on multiple day backpacking trips that, aside from looking like they are packed for a 3 week excursion, their packs are obviously packed improperly – gear strapped in on every possible place outside the pack and nothing packed inside; 5 lb tent packed on one side, pots and pans dangling on the other side, clanking with every step. You name it – we have seen it! (US article)
Imagine—weekends roaming the mountainsides together, bonding over vast vistas, wildlife sightings and summits reached. Family vacations with an active slant—camping and trekking both at-home and abroad. An active and healthy lifestyle the whole family will enjoy and activities that forge self-confidence, promote problem-solving skills and instill a love of and respect for nature.
Sounds great, right? Well—it all rests on how you choose to introduce your child to the sport of hiking.
Trip Intentions
A collection of resources to help you decide how best to leave your trip intentions with somebody responsible – where you are going, what you are doing, emergency contacts and so on; or to create your own Trip Intentions Form.
If you’re looking for a close encounter with nature, why not try bushwalking? Walking tracks can take you to places you won’t reach in a car and most are graded to make walking easy.
This website and its associated podcast is designed to provide a unique resource, including upfront opinions based on our experiences on the trail that we hope will assist you in achieving your hiking goals.
Are you keen to learn more about Bushwalking? This site will help you not merely survive out in the bush, but thrive! Get ready for your next adventure…
Bushwalking Queensland is the peak body that represents the interests of bushwalkers and members of affiliated bushwalking clubs in the state of Queensland, Australia.
Our site offers detailed information on hiking trails including trail descriptions, key features, pictures, maps, gpx files, elevation profiles and more. Additionally, the site is organised to make it easier for hikers to compare and choose trails that best suit their hiking preferences.
With our website, hikers can search for trails based on location, hiking grading, distance, or they can simply view an alphabetical listing. We host gpx files for all trails so that you can easily navigate to the start point and the trail itself. This information will benefit any day or overnight hiker; including people looking for a short stroll to a nearby lake or a long distance hiker heading for a distant peak!
Trail Hiking’s goal is to become the most comprehensive source for free information on hiking trails throughout Australia, including gear reviews, helpful tips and planning advice. In order to do this we are seeking your support. Please send us your trail info and GPX files for inclusion on our site.
Adventure Activity Standards (AAS) are minimum, voluntary guidelines for conducting outdoor recreation activities . Designed primarily for organisations conducting outdoor recreation activities where the participants are dependent on the activity provider, they are also a useful reference for all outdoor enthusiasts.
The Outdoor Leader Online is based on the content of the Bushwalking and Ski Touring Leadership Manual, last published by the Bushwalking and Mountaincraft Training Advisory Board (BMTAB) in Victoria in 2000. The content of this Manual was the basis of the excellent outdoor leadership training courses run by the BMTAB. Following the Black Saturday bushfires in 2009, a Victorian Outdoor Industry Taskforce attracted funding to improve risk management and community confidence in outdoor activity providers. The project to make this resource available online was a component of that endeavour.
Top ten Australian trails? Too easy. Try a top one hundred! Here’s the ultimate mega list of trails to target as your next Australian bushwalking odyssey. Courtesy of Rays
Aussie Bushwalking is a user-supplied list of bushwalking and hiking tracks in Australia – made by bushwalkers, for bushwalkers. It helps bushwalkers find new walks, share walks and track conditions and remember their Australian bushwalking/hiking activities.
We love the outdoors here at Cool of the Wild. We’re mad about gear and camping; jump at the chance to try new things and go new places and generally have endless enthusiasm for any excuse to get out there and enjoy the outdoor world.
We are so pleased to be sharing adventures, skills, tips and information and to be inspiring people to find and follow their own passions.
Welcome to High and Wide! Action, outdoors and adventure photography, writing and more.
Blogging and Social Media
The Hiking in South-East Queensland blog is into its 5th year. Feel free to browse the archives, or pick a category to find a walk from a particular park. Blogging is a core part of what I do and allows me to give readers a taste of what I enjoy or see while out and about as well as providing one way to showcase my photography.
About Me
My name is Cameron Semple and my passion is being active in the outdoors and documenting that experience for others to share.
Recommend a Resource
Have an interesting or useful resource or link to share?
Let us know by Recommending a Resource
Newsletter
Sign up for the eNewsletter and keep up to date with everything outdoors in Queensland. After you click Subscribe, check your email to confirm.
Become a member
We welcome membership applications from outdoor organisations and individuals
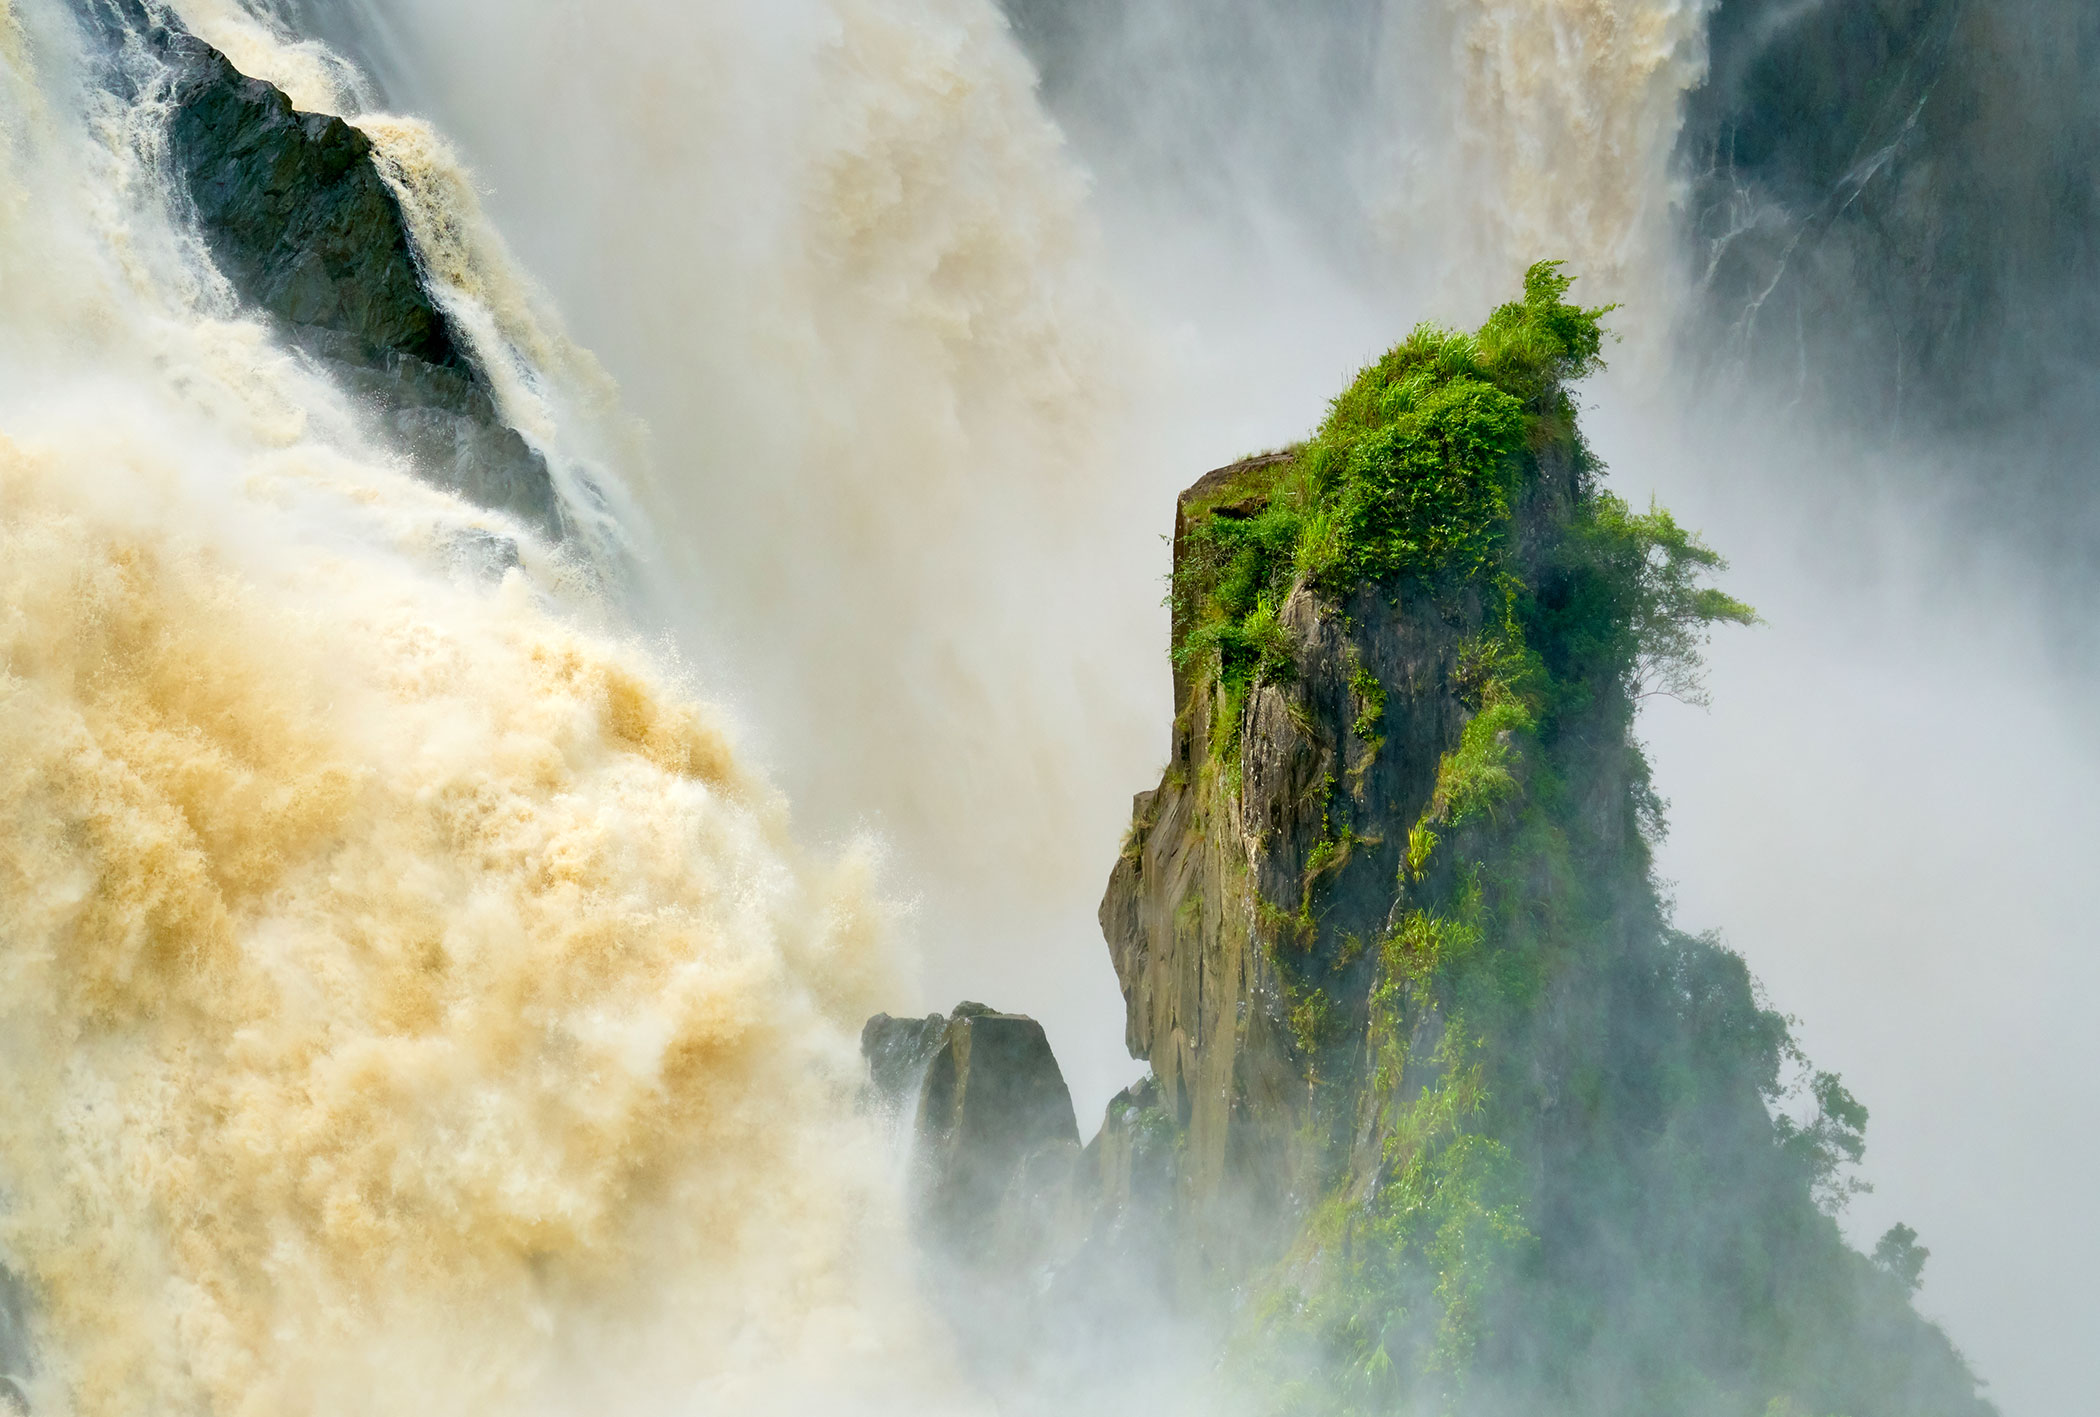


 Image: Greg Cartwright © Queensland Government